How to Check Mouse DPI Without a DPI Analyzer
By DPI Analyzer TeamPublished Updated
You open a game, your aim feels off, and you wonder, what DPI is my mouse actually running at? Most people reach for a DPI analyzer tool, and honestly, that is the fastest and most accurate option. But what if you do not have access to one right now? Can you still figure out your mouse DPI?
Yes, you can. There are a few different ways to check or estimate your mouse DPI without ever opening a browser-based analyzer. Some of these methods pull the number straight from your device's software. Others give you a close estimate using nothing more than a ruler and a free image editing tool. None of them is complicated.
This guide walks through each method clearly so you can figure out which one works best for your setup.
Why Knowing Your Mouse DPI Actually Matters
Before jumping into the methods, it helps to understand why this number is worth knowing in the first place.
DPI is dots per inch. It tells you how far your cursor moves on screen for every inch you move your mouse. A mouse set to 800 DPI will move the cursor 800 pixels for every inch of movement. Set it to 1600 DPI, and the same physical inch of movement sends the cursor twice as far.
DPI Affects More Than Just Speed
Your DPI setting directly shapes your aiming precision in games, your control in design software, and even how quickly you can navigate across a large monitor. Two people can sit at the same PC with the same game open and experience completely different “feels” just because of different DPI settings.
For competitive games like Valorant and CS2, most pro players keep their DPI between 400 and 800. A lower DPI gives more precise control for small micro-adjustments. A higher DPI makes fast target acquisition and 180-degree turns easier. Neither is universally right, but knowing what you are running is the only way to tune it intentionally rather than guessing. For a broader breakdown beyond competitive shooters, see our DPI recommendations for every screen and play style.
If you want to carry your sensitivity feel from one game to another, knowing your hardware DPI is also the starting point for any Valorant to CS2 sensitivity conversion; without it, the math will be off.
Method 1: Check Your Mouse Manufacturer's Software
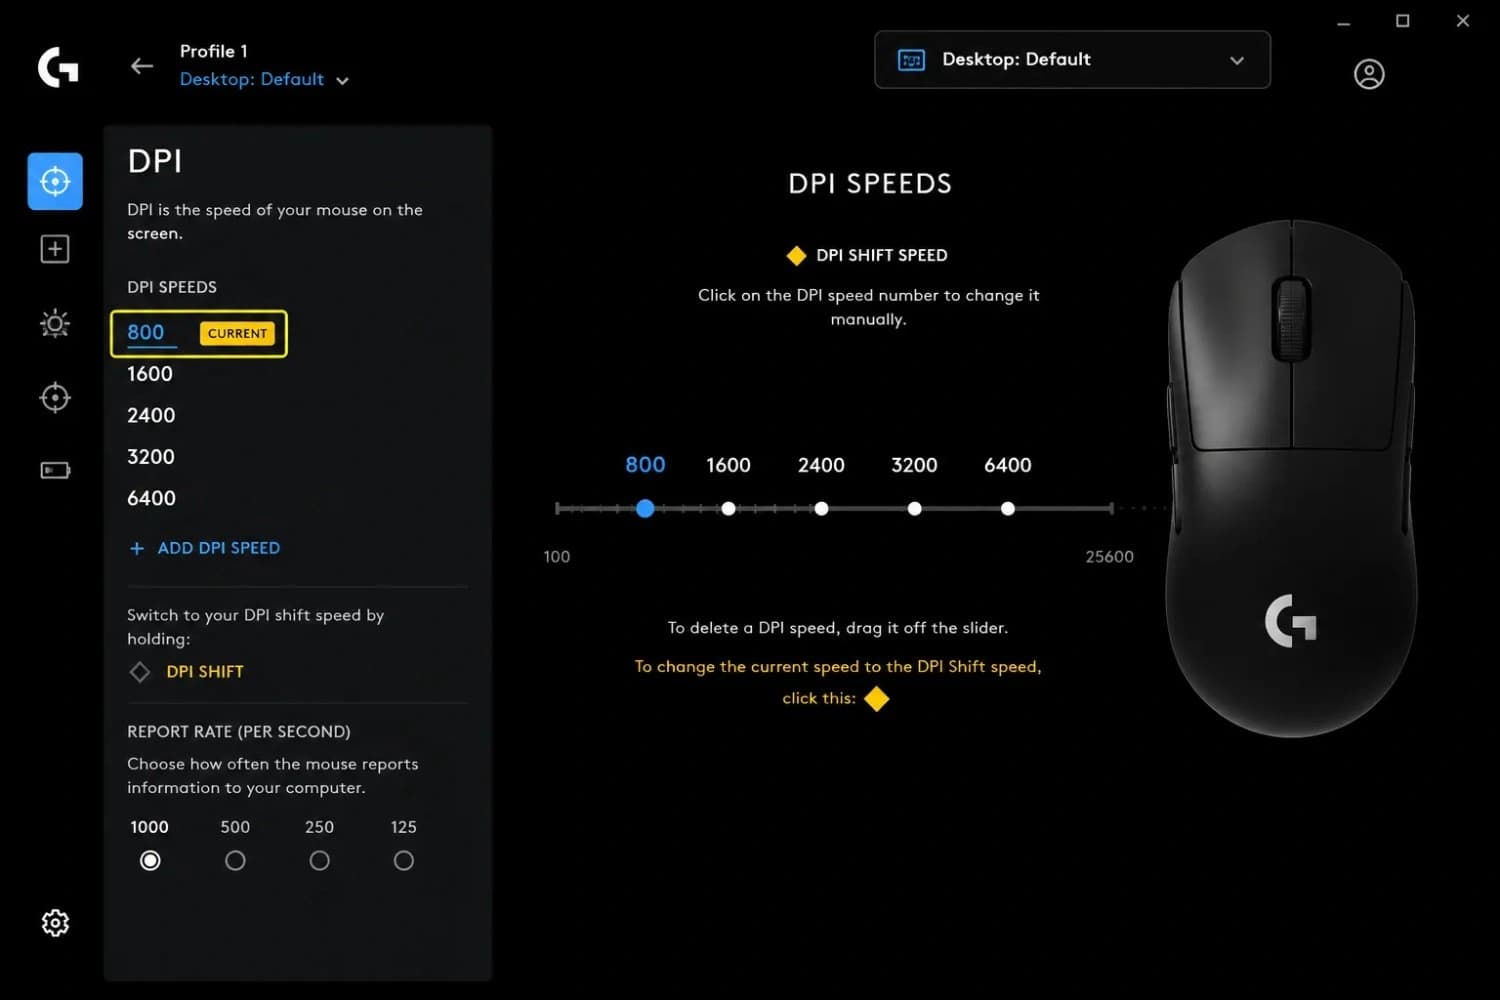
This is the easiest method for anyone with a branded gaming mouse. Most popular gaming mice from Logitech, Razer, SteelSeries, Corsair, HyperX, and similar brands come with companion software that displays and controls your DPI settings directly. If you want the full walkthrough for actually adjusting the value rather than just reading it, see our guide on how to change DPI on a mouse.
Logitech G Hub
If you have a Logitech gaming mouse, open Logitech G Hub on your PC. Click your mouse in the device list on the home screen, then navigate to the Pointer section. You will see your current DPI profile listed there along with any stored preset values. G Hub shows what DPI your mouse is configured for at each profile level.
One thing to be aware of: G Hub shows your configured DPI target, not a physically measured value. If your sensor has any variance from the target, G Hub will not tell you that. For most everyday use, this is fine. For competitive gaming where even a 5% deviation matters, a physical measurement is more reliable.
Razer Synapse
Open Razer Synapse 3 and select your mouse. Under Performance, you will see your DPI settings either as a slider or a numeric field, depending on your mouse model. Most Razer mice support DPI in increments of 50, so the displayed value should be a good approximation to what you are actually getting.
SteelSeries GG (Engine)
Open SteelSeries GG and go to your mouse settings. The DPI or CPI value is listed under the sensitivity section. Older SteelSeries software was called SteelSeries Engine; if you have an older mouse, that is the one to look for instead.
Corsair iCUE
Open Corsair iCUE and select your mouse from the device panel. Navigate to Actions or DPI depending on your model, and your current sensitivity value will be displayed there. Note that older guides sometimes reference Corsair Utility Engine (CUE); that software has been replaced by iCUE, so make sure you are using the current version.
No Software Installed?
If you don't have the manufacturer's software, check your mouse model in the product page on the brand's website. Most product pages will list the default DPI settings and presets available. Some mice also have indicator lights that change colour to signal different DPI stages. Check your manual or the manufacturer’s support page for what each light pattern means.
Method 2: Use the Windows Mouse Settings Panel
Windows itself does not display your DPI; that value lives at the hardware level, not the OS level. However, the Pointer Speed setting in Windows gives you a reference point that can help you cross-reference your sensitivity feel, and disabling pointer acceleration is a key step before any DPI testing.
Windows Pointer Settings Location
- Open Start menu
- Select Settings
- Click on Bluetooth & Devices.
- Choose Mouse.
- Select Additional Mouse Settings.
Here you will see a slider labelled Motion and a checkbox labelled Enhance Pointer Precision. That checkbox is Windows pointer acceleration. When it is turned on, your cursor moves faster when you move your mouse quickly and slower when you move it slowly. This makes your DPI effectively unpredictable, which is exactly why disabling it matters before any testing.
What the Pointer Speed Slider Tells You
The pointer speed slider in Windows runs from 1 to 11 notches. The middle position (notch 6 of 11) represents a 1:1 ratio with no Windows-level scaling applied. If your slider is above the middle, Windows is amplifying your mouse movement. Below it, and Windows is reducing it.
This setting does not tell you your DPI, but it does tell you whether Windows is modifying the output your sensor is delivering. For accurate DPI testing, whether through software or a manual method, set this slider to the middle position and turn off pointer precision first.
Method 3: The Manual Ruler Method (No Tools Required)
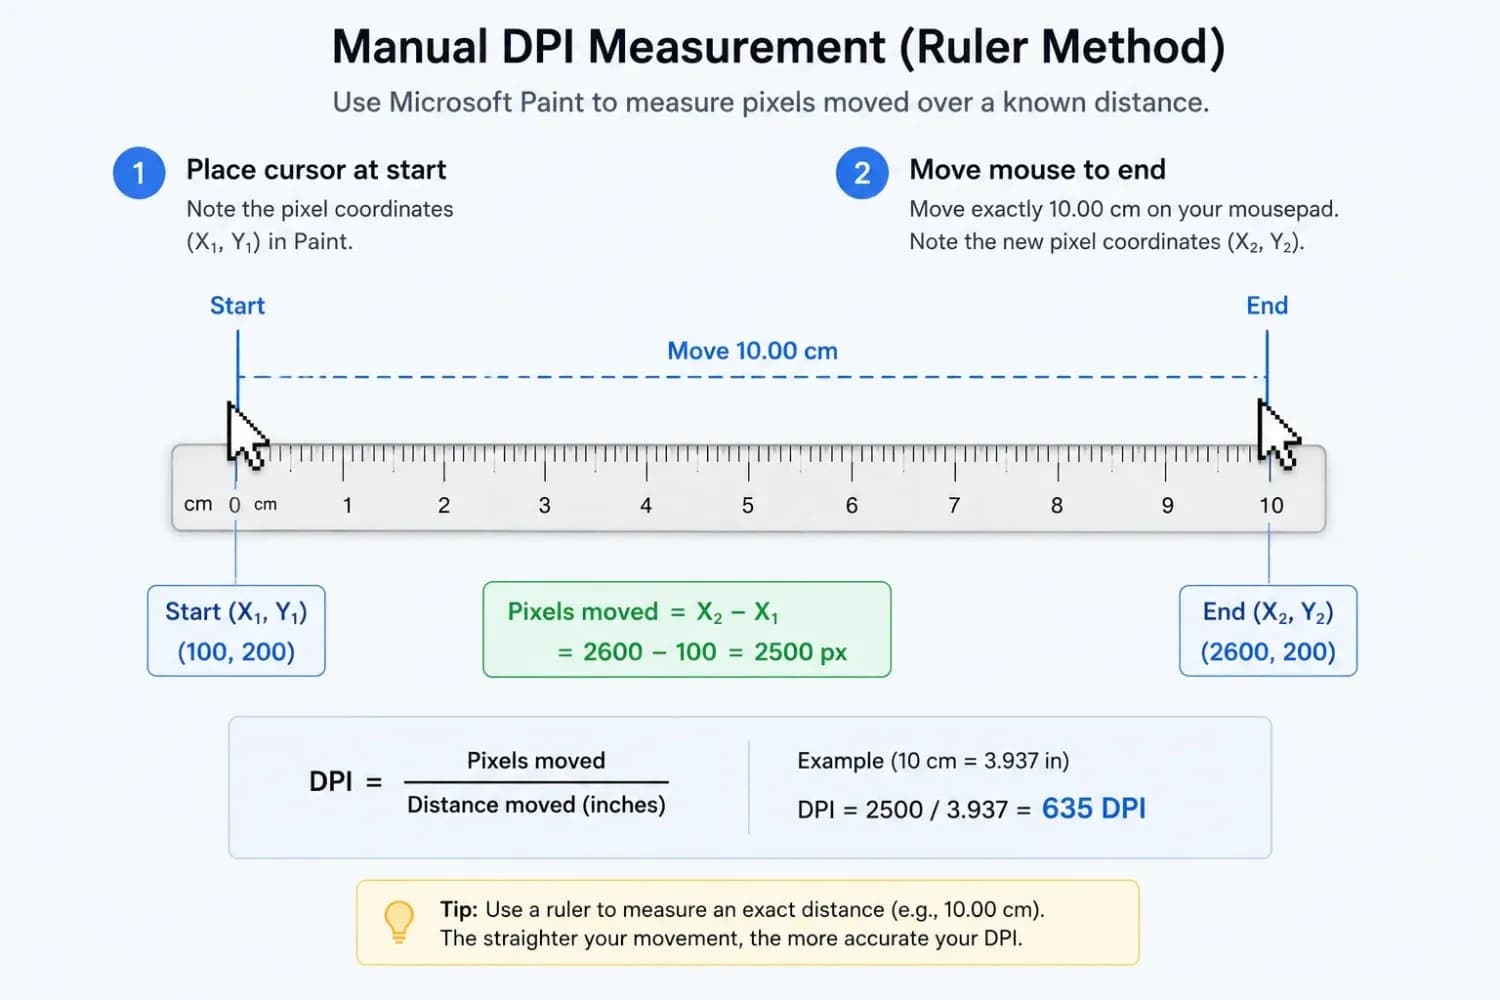
This is the offline version of what a browser-based DPI analyzer does. It takes about five minutes, requires a ruler and Microsoft Paint (or any app that shows cursor coordinates), and gives you a surprisingly accurate DPI estimate. Mac users do not have Paint, so if you are on macOS, follow our DPI analyzer on Mac guide instead, which uses the same ruler-based principle through System Settings and a browser test.
What You Need
- A ruler (ideally a 15–30 cm ruler)
- Microsoft Paint, or any image editor that displays X/Y pixel coordinates
- Your mouse on its usual surface
Step-by-Step Instructions
Step 1: Open Microsoft Paint. Press Ctrl+Shift+F or look at the bottom-left of the window, you should see real-time pixel coordinates that update as you move your cursor. If you do not see them, right-click the status bar at the bottom and make sure Cursor Position is checked.
Step 2: Disable Windows pointer acceleration before measuring. Open Mouse Settings.
- Click on Additional Mouse Settings.
- Select the Pointer Options tab.
- Uncheck Enhance Pointer Precision
Set the pointer speed slider to the middle notch (6 of 11). If acceleration is active during your measurement, you will get a false reading every time.
Step 3: Move your mouse to the extreme left edge of your ruler, at the 0 cm mark. Record the X coordinate that the Paint shows.
Step 4: Drag your mouse in a straight line, horizontally, for 2.54 cm (that is, one inch). Try to make your movement consistent and straight. Record the new X coordinate in Paint.
Step 5: Subtract the starting X coordinate from the ending X coordinate. The difference is the number of pixels your cursor moved in an inch, which is your DPI. Example: Starting coordinate: 412 px. Ending coordinate: 1212 px.Difference: 800 px. That mouse is running at 800 DPI.
How to Improve Accuracy
Run the measurement three times and average the results. A single pass can include small errors from hand movement at the start or end of the stroke. Averaging three clean passes gets you within 1–2% of your true value.
Use a longer movement distance to reduce the margin of error. Moving 5 inches instead of 1 gives you five times the pixel count to work with. Divide the total pixel count by 5 to get your DPI.
Method 4: Check the Sticker on Your Mouse or the Box
This sounds obvious, but it is worth mentioning. Many budget and mid-range mice print the DPI range on a sticker on the bottom of the mouse body itself. The sticker usually shows the maximum DPI your sensor supports, or a fixed DPI value if the mouse does not have adjustable stages.
Your mouse box, if you still have it, should also list the DPI specification in the technical details section. This tells you the configured or maximum value, not your actual sensor output, but for a basic mouse without software control, it is often the most direct answer available.
For mice with physical DPI buttons that cycle through preset stages, the box or manual will list what each stage is. If your mouse has three LED indicators and cycles through three colours, the manual will map each colour to a DPI value.
Method 5: Search the Model Name Online
If your mouse has no sticker, no box, and no software, the product page on the manufacturer’s website will list the DPI specifications. The support page for your model may also have a manual or setup guide that includes this information.
Search for your exact model name plus “DPI specs” or “sensitivity settings.” For example: Logitech G305 DPI stages or Razer DeathAdder V3 default DPI. The product page almost always lists the default DPI value and available preset stages.
The Rtings mouse database is another useful reference; it independently tests and documents DPI accuracy, sensor performance, and sensitivity specifications for hundreds of mice.
How Accurate Are These Methods Compared to a DPI Analyzer?
Here is the honest answer: manufacturer software shows your configured DPI target, not your measured output. The manual ruler method gets you within 1–3% if done carefully. Neither tells you what your sensor is physically delivering the way a browser-based measurement tool does.
For most people, this gap does not matter much. If your manufacturer's software says 800 DPI and your aim feels right, you are done. But if you are a competitive player trying to dial in the same feel across multiple games, or if you suspect your DPI button stopped working correctly, a physical measurement removes all the guesswork. From there, converting sensitivity between games becomes a matter of plugging in the right numbers instead of guessing.
If you want to verify your actual sensor output after using any of the above methods, our DPI Analyzer measures your real hardware DPI using a ruler and your browser in under 60 seconds, no download, no account needed. It is the same physical measurement principle as the Paint method above, but with better accuracy and instant results.
For a deeper look at accuracy differences between measurement approaches, see our breakdown of how accurate a DPI analyzer really is.
Quick Comparison: Which Method Should You Use?
| Method | What It Measures | Accuracy | Best For |
|---|---|---|---|
| Manufacturer software | Configured DPI target | Software-reported | Quick check, branded gaming mice |
| Windows settings | Pointer speed scaling | Not a DPI reading | Disabling acceleration before testing |
| Manual ruler + Paint | Physical sensor output | 1–3% with care | No software available, any mouse |
| Box/sticker | Rated or max DPI | Spec sheet value | Basic mice with no software |
| Online product page | Documented spec | Spec sheet value | Unknown or budget mice |
| DPI Analyzer tool | Real physical sensor output | Within 1–2% | Highest accuracy, gaming calibration |
Conclusion
You do not need a DPI analyzer to get a solid read on your mouse sensitivity. The manufacturer's software gives you the configured value in seconds. The manual ruler method gives you a physically measured estimate with nothing more than Paint and a ruler. And for budget or unbranded mice, the product page or sticker on the bottom usually has what you need.
That said, if you want the most accurate number, especially before tuning a competitive setup or converting sensitivity between games, measuring your actual sensor output beats any of these methods. Our DPI Analyzer does exactly that, directly in your browser, in under a minute.
Once you know your real DPI, everything else, your in-game sensitivity, your eDPI, your aim trainer settings, can be built on numbers that actually reflect what your hardware is doing. Running that number through a mouse sensitivity analyzer can show you exactly how it plays out across your settings.
Related Tools and Guides
- DPI AnalyzerMeasure the DPI your mouse sensor actually delivers, using nothing but a ruler and your browser.
- How Accurate Is a DPI Analyzer?The real margin of error of a browser DPI analyzer, what affects it, and how to get readings within 1–2% of your true DPI.
- How to Change DPI on a MouseAdjust your DPI using software or built-in buttons, with quick setup steps for Logitech, Razer, SteelSeries, and more.
- DPI Analyzer on MacMeasure your real mouse DPI on macOS in any browser, and tame Mac's acceleration curve for an accurate, repeatable reading.
Measure your real DPI in 60 seconds
Open the DPI AnalyzerFrequently Asked Questions
Yes. If your mouse came with companion software from the manufacturer, you can open it and read your configured DPI directly. If not, check the sticker on the underside of the mouse or the product page online for your specific model. These methods give you the target value rather than a measured reading, but they are fast and require nothing extra.
No. Windows does not display DPI at the operating system level. The pointer speed slider in Mouse Settings shows how Windows scales your mouse movement, but that is not the same thing as DPI. Your DPI value lives in the mouse hardware and firmware; only the manufacturer's software or a physical measurement can retrieve it.
For most gaming purposes, yes. If you run the test three times and average the results with pointer acceleration disabled, you will typically land within 2–3% of your true DPI. That is close enough for setting up in-game sensitivity and calculating your eDPI. If you need tighter accuracy, for sensitivity conversion between games, for example, a browser-based DPI analyzer is more reliable because it controls more variables.
Check the manual or support page for your specific model on the manufacturer’s website. Most DPI buttons cycle through factory-set presets (common ones are 400, 800, 1600, 3200). The documentation will list the exact values for each stage. If you have manufacturer software installed, it will also show you each preset and let you customise them.
For competitive FPS games like Valorant and CS2, most players use 400–800 DPI. For MOBAs and strategy games, 800–1600 works well. For general desktop use and productivity, 1000–1600 is comfortable on most screen sizes. There is no universally correct answer; the right DPI is the one that matches your in-game sensitivity, your mousepad size, and how you naturally move your arm. See our guide on DPI recommendations for every screen and play style for a more detailed breakdown.