DPI Recommendations: Finding the Sweet Spot for Every Screen
By DPI Analyzer TeamPublished Updated
Most people never touch their DPI. They plug in their mouse, leave it on whatever preset it shipped with, and just deal with the result, a cursor that feels slightly too fast, slightly too sluggish, or just off in a way they can't quite name. The thing is, that preset is rarely the right one for you.
DPI, Dots Per Inch, controls how far your cursor travels on screen for every inch you move the mouse across a surface. Change it, and everything feels different: precision shots become easier, long desktop sweeps take less arm movement, and design work feels less like you're fighting the hardware.
The sweet spot isn't the same for everyone. It depends on what you're doing, what screen you're using, and how you naturally move. This guide breaks it down use case by use case, so you can pick a starting point that actually makes sense for your setup.
Why DPI Matters More Than Most People Think
Here's a simple way to think about it. At 400 DPI, moving your mouse one inch moves your cursor 400 pixels. At 3200 DPI, that same inch moves it 3200 pixels. Same hand movement, completely different result on screen.
That gap matters a lot once you start doing anything that requires precision, aiming in a competitive game, selecting a thin layer in Photoshop, or clicking a small UI element on a 4K display without overshooting it by three icons.
People often try to fix DPI problems the wrong way. They turn the in-game sensitivity way down to compensate for a DPI that's too high, or they bump up the Windows pointer speed to make a low-DPI mouse feel usable. Neither approach is clean. You end up with a software workaround layered on top of a hardware mismatch, and the feeling never quite settles.
Starting with the right DPI for your use case avoids all of that. And if you're not sure what DPI your mouse is actually running at, not the advertised figure, but the real measured output, that's worth checking before you commit to any setting.
Pro tip:
DPI Recommendations by Use Case
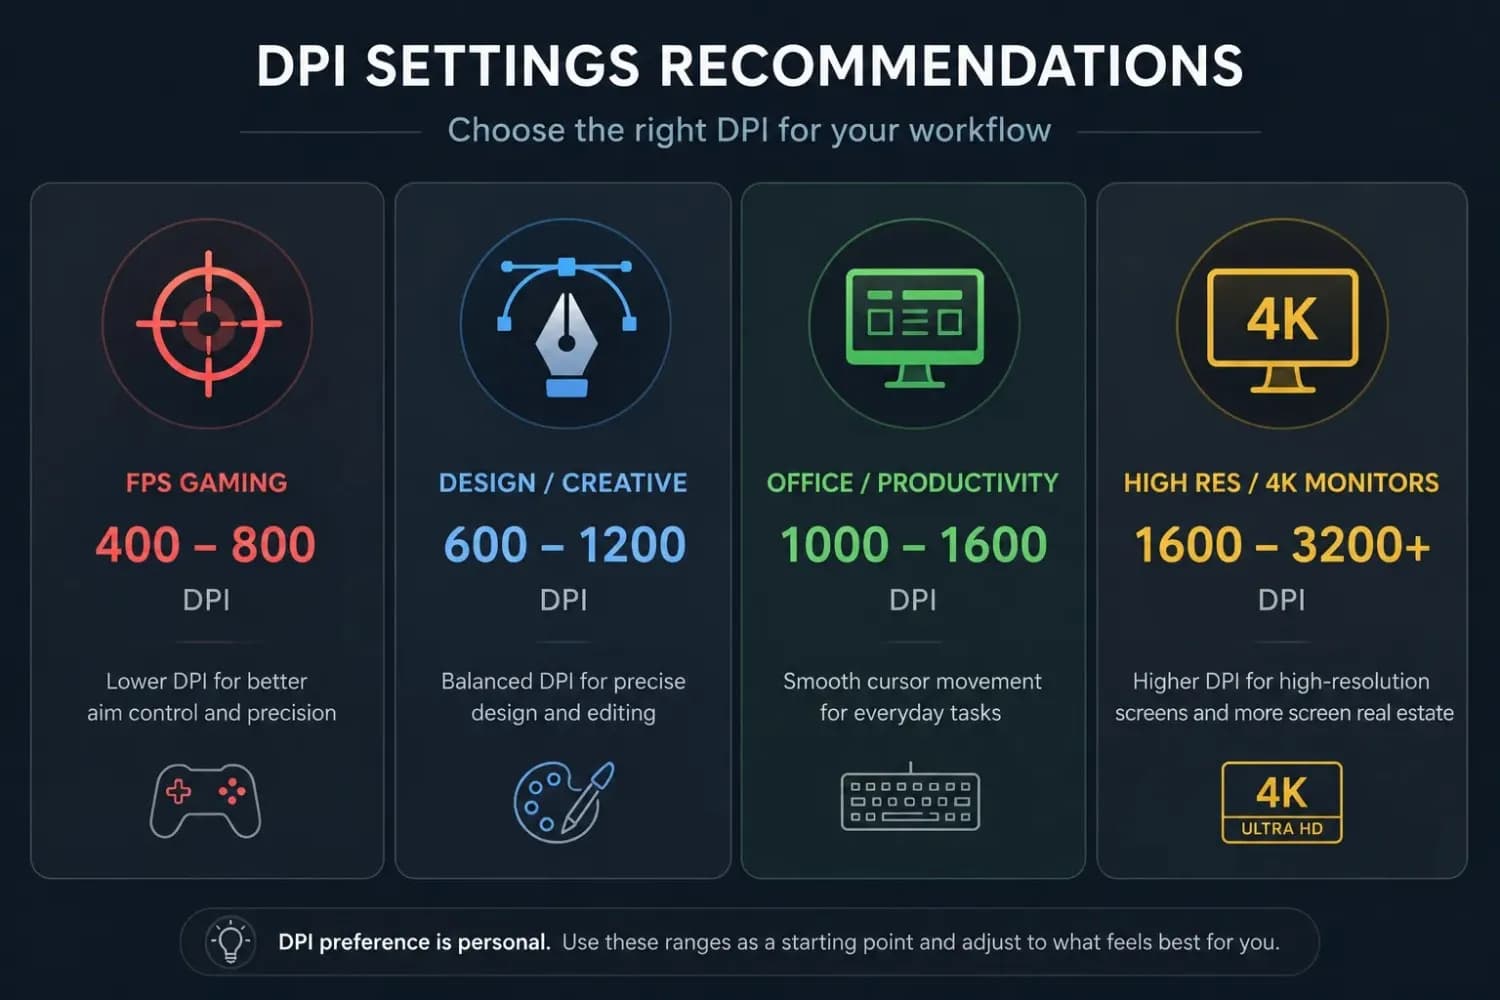
There's no single correct DPI. But some ranges work well for specific activities, and they're based on how much precision a task requires and how much screen real estate you're working with.
| Use Case | Recommended DPI | Why It Works |
|---|---|---|
| FPS Gaming (CS2, Valorant, Apex) | 400 – 800 | Lower DPI spreads movement across more physical distance, making small corrections easier and muscle memory more consistent |
| MOBA & Strategy Games | 800 – 1,600 | A faster cursor helps with multi-unit control and map navigation, where speed matters more than micro-precision |
| Graphic Design & Illustration | 600 – 1,200 | Mid-range DPI balances fine brush control with practical cursor travel, enough precision without fighting the pen |
| General Office & Productivity | 1,000 – 1,600 | Fast enough for large screens and multitasking without constantly overshooting small targets |
| 4K & Multi-Monitor Setups | 1,600 – 3,200+ | High DPI reduces the physical drag distance needed to cover a large resolution, keeping arm movement manageable |
These are starting points, not rules. The right number within each range depends on your screen size, your mousepad dimensions, and how you personally move. A small pad on a 1440p monitor might push you toward the higher end of the gaming range. A wide desk setup might let you go lower and still have comfortable movement.
FPS Gaming: Why Low DPI Wins at the Top Level
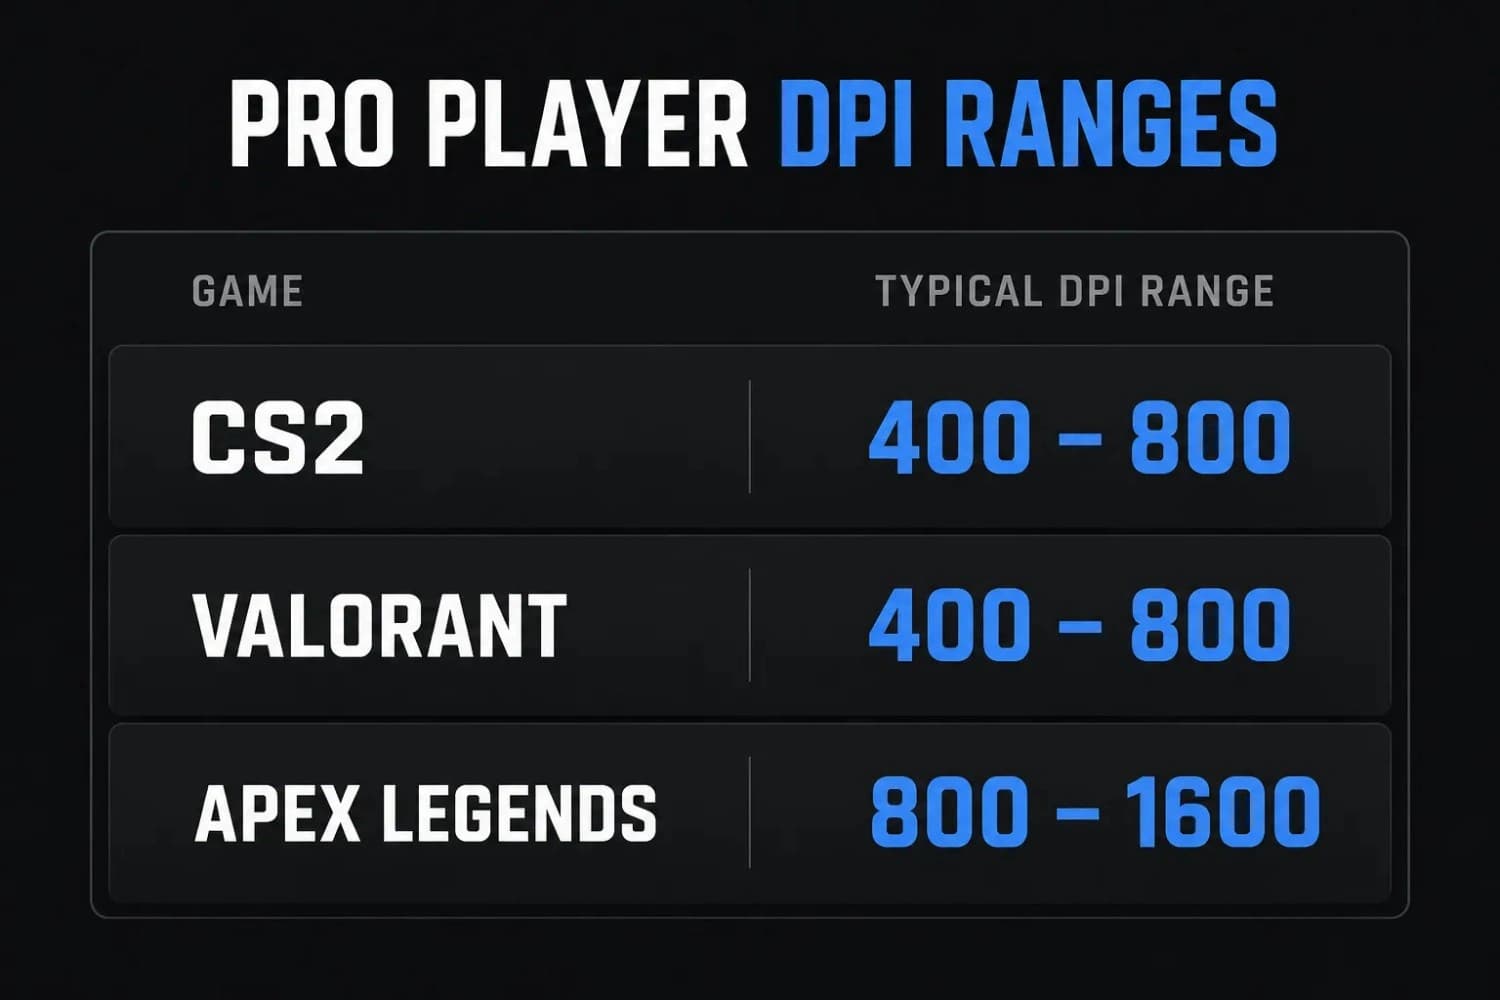
Almost every professional FPS player, across CS2, Valorant, and similar games, runs somewhere between 400 and 800 DPI. That's not a coincidence, and it's not just tradition. At those lower values, each pixel of cursor movement requires more physical movement from your hand. That means small muscle corrections translate into finer adjustments on screen, which is exactly what you need when you're trying to align a crosshair on a moving head. If you split time between both titles, converting your Valorant sensitivity to CS2 accurately matters just as much as picking the right DPI.
High DPI in FPS games tends to feel faster at first, but it punishes imprecision. Any small hand tremor becomes an overshoot. That's why even players with small mousepads who need to lift and reposition frequently still tend to stick to the 400–800 range and compensate through their in-game sensitivity setting, not their DPI. Once you've found your hardware DPI, you can use our eDPI calculator to understand how your DPI and in-game sensitivity combine into your effective sensitivity across any game.
Design and Creative Work: Precision Over Speed
Design work puts different demands on DPI than gaming does. You're not tracking a moving target; you're placing things accurately and working with fine details that need clean edges. Too high a DPI and small wrist movements become big jumps on the canvas. Too low and you're dragging your whole arm across the desk just to cross a Figma artboard.
The 600–1200 range tends to work well because it keeps cursor movement proportional to hand movement without making large sweeps exhausting. Illustrators working at high zoom levels may prefer the lower end. Motion designers and layout artists who switch between panels quickly tend to drift toward the higher end.
Office and Productivity: Comfort Is the Goal
For most office use, email, spreadsheets, web browsing, and documents, precision is rarely the limiting factor. The main issue is usually how much physical effort it takes to move the cursor from one side of the screen to the other. On a single 1080p or 1440p monitor, 1000–1200 DPI tends to feel natural for most people. On a wider setup or dual monitors, bumping to 1400–1600 saves a lot of wrist movement over the course of a day.
DPI and Screen Size: The Connection Most Guides Skip
Most DPI guides give you a number without explaining what changes when your screen does. Here's the relationship: higher resolution means more pixels per inch on your physical display. Moving your cursor the same number of pixels covers less visual distance on a 4K screen than on a 1080p screen.
That's why a DPI setting that feels comfortable on a 1080p 24-inch monitor can feel sluggish on a 27-inch 4K display. The cursor is covering the same number of DPI counts, but those counts map to a smaller fraction of the screen.
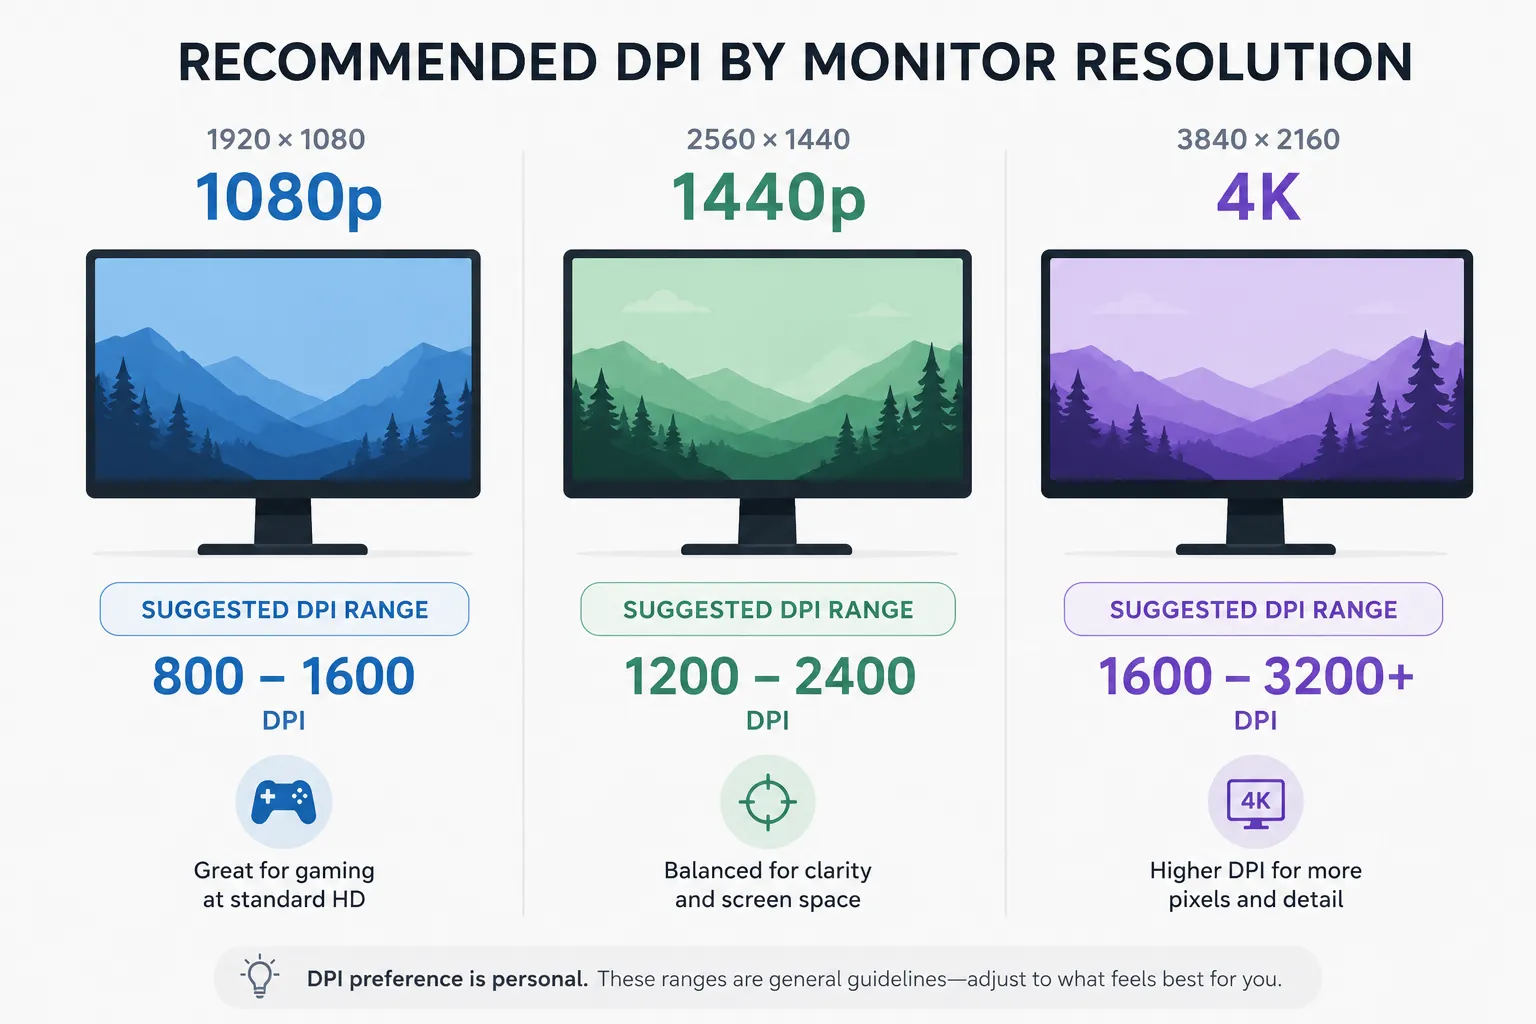
| Monitor Resolution | Typical Screen Size | Suggested Starting DPI |
|---|---|---|
| 1080p (Full HD) | 21–24 inch | 800 – 1,200 |
| 1440p (2K / QHD) | 24–27 inch | 1,200 – 1,600 |
| 4K (UHD) | 27–32 inch | 1,600 – 3,200 |
| Ultrawide (2560×1080 or 3440×1440) | 29–34 inch | 1,200 – 2,000 |
| Dual Monitor Setup | Any | 1,400 – 2,400, scale to total desktop width |
These ranges assume you're doing general use or productivity work. If you're gaming on a 4K screen, you'd still stay in the lower gaming DPI range; resolution doesn't change the precision argument for FPS play the same way it changes desktop navigation.
High DPI vs Low DPI: What Actually Changes Day to Day
Low DPI (Under 800)
Low DPI forces you to move your arm more. That might sound like a downside, but for tasks that reward precision, it's actually an advantage. More physical distance per pixel means more control over where the cursor lands. The tradeoff is that large screen traversals, moving from one corner to another, switching between windows on a wide display, take more effort.
Most competitive gamers, especially in tactical shooters, stay here permanently. The improved micro-control at range outweighs the inconvenience of wider arm movements.
Mid DPI (800–1,600)
This is where most people land, and it's a reasonable place to be for anything that doesn't require extreme precision. Design work, office use, casual gaming, the 800–1600 range handles all of it without demanding large arm movements or giving up too much control.
If you don't know where to start, 1000 DPI on a 1080p display or 1200 DPI on a 1440p display are both solid defaults that most people find comfortable within a day or two.
High DPI (1,600 and Above)
High DPI becomes genuinely useful as screen size and resolution increase. On a 32-inch 4K display, 1600–3200 DPI keeps cursor travel proportional to what you'd experience on a smaller screen. Without it, you're physically dragging the mouse further than needed just to cross the desktop.
High DPI is less useful for precision tasks. At 3200+ DPI, your cursor is covering a lot of pixels per tiny hand movement, which makes fine work harder. Use it for navigation and scale back when you need control.
Does Your Mouse Actually Deliver the DPI You Set?
This is something most DPI guides don't address, but it matters. When you set 800 DPI in Logitech G Hub or Razer Synapse, you're telling the firmware what to target. You're not measuring what the sensor actually delivers. If you'd rather skip the software entirely, you can check your mouse DPI without a DPI analyzer using a few manual methods instead.
In practice, sensor variance, mouse pad friction, and firmware interpolation can shift your real DPI output by 5–10% from the configured value. Independent testing from Rtings mouse lab data shows this kind of deviation is common across popular mice at various DPI settings, not a sign of a broken mouse, just normal hardware behaviour.
That gap is usually not noticeable for office work. But if you're trying to match a specific eDPI, convert sensitivity across games with a mouse sensitivity converter, or build consistent muscle memory in an aim trainer, the deviation matters. Building your settings on a number that's 7% off means your aim training and your in-game results will always feel slightly misaligned.
Common DPI Mistakes and How to Avoid Them
Thinking Higher DPI Always Means Better Performance
Mouse manufacturers market high DPI numbers as a selling point. Some gaming mice advertise 25,000 DPI or more. In reality, almost no one should ever use those settings. The reason is that at extreme DPI values, even the smallest physical hand tremor translates into a visible cursor jump. The hardware isn't working for you anymore; it's amplifying noise.
A DPI of 25,000 is not a useful feature for gaming or precision work. It's a spec sheet number. Your actual sweet spot will almost certainly be somewhere between 400 and 3200, depending on what you're doing.
Adjusting DPI and In-Game Sensitivity at the Same Time
This is one of the most common ways people end up in a confused sensitivity spiral. They raise their DPI, feel like the cursor is too fast, immediately lower their in-game sensitivity to compensate, and end up somewhere they didn't intend, with no clear way back.
If you're making changes, adjust one thing at a time. Change your DPI, play with it for a session, then decide whether the in-game sensitivity still needs adjustment. If you want to understand how the two interact mathematically, that's exactly what an eDPI calculator is for.
Forgetting to Disable Pointer Acceleration
Windows Enhance Pointer Precision is enabled by default on most systems, and it changes how your cursor responds based on how fast you're moving the mouse. Move slowly, and your cursor travels a short distance. Move quickly, and it travels much further than the raw DPI math would suggest.
This makes any DPI setting you choose feel inconsistent, because the effective sensitivity changes with how fast you're moving. If you're trying to dial in a specific DPI and have it feel repeatable, turn this off first. Go to Windows Settings, then Bluetooth and Devices, then Mouse, then Additional Mouse Settings, then the Pointer Options tab, and uncheck Enhance Pointer Precision.
Assuming the DPI Button Click Actually Registered
If you're using the physical DPI button on your mouse to cycle between presets, there's no on-screen confirmation by default unless your mouse has an indicator light or software overlay. You can easily end up one step past the setting you wanted and not realise it. Before locking in a sensitivity setup, check out our guide on how to change DPI on your mouse. It covers the exact process for all major mouse software and explains how to verify what you've actually set.
How to Find Your Personal DPI Sweet Spot
Here's a practical process that works, rather than just experimenting randomly until something feels okay.
- Start with the use case table above and pick the range that matches your primary activity.
- Set your DPI to the midpoint of that range. Turn off Enhance Pointer Precision in Windows before you do anything else.
- Use it for at least one full session, not five minutes. Your muscle memory needs time to adjust before you can accurately judge whether a setting is right.
- If the cursor feels too fast: lower DPI by 200, not more. If too slow: raise by 200. Make one change at a time.
- Once you find a range that feels right, verify your real DPI with a physical measurement. Use the DPI Analyzer tool, set a known distance with a ruler, move the mouse that distance, and read the actual output.
- Lock that measured number in. Build your in-game sensitivity, aim trainer settings, and any sensitivity conversions around the real measured value, not the configured one. Run it through the mouse sensitivity analyzer to see how your current setup holds up.
The whole process usually takes two or three short sessions. Once you've found it, you're done. Most people who go through this process don't need to revisit it for years.
Conclusion
The right DPI isn't the highest your mouse can do, and it's not whatever shipped as a default. It's the setting that matches your screen, your primary activity, and how you naturally move.
Start with the range for your use case. Disable Enhanced Pointer Precision first. Give each change at least one full session before judging it. And once you find a setting that feels right, verify the real hardware output rather than trusting the configured number. Calibrated hardware means every sensitivity setting you build from there is actually built on something accurate.
Related Tools and Guides
- DPI AnalyzerMeasure the DPI your mouse sensor actually delivers, using nothing but a ruler and your browser.
- eDPI CalculatorMultiply DPI by in-game sensitivity and see where your eDPI sits against the competitive range for your game.
- How to Change DPI on a MouseAdjust your DPI using software or built-in buttons, with quick setup steps for Logitech, Razer, SteelSeries, and more.
- How Accurate Is a DPI Analyzer?The real margin of error of a browser DPI analyzer, what affects it, and how to get readings within 1–2% of your true DPI.
Confirm your real DPI
Open the DPI AnalyzerFrequently Asked Questions
For competitive FPS games like CS2 and Valorant, 400–800 DPI is the range most serious players use. 800-1600 is more realistic for MOBAs and action games. The best DPI for gaming is the one where you can aim accurately without needing to move your arm too much or lose precision uncontrollably.
Depends on the game. For fast-paced games like Overwatch or Apex Legends, 1600 dpi is a setting used by many high-level players. For precision shooters like CS2 or Valorant, most competitive players consider 1600 dpi to be on the high side; the loss of control at range tends to outweigh the benefit of faster turns.
For general desktop use and productivity on a 4K display, 1600–3200 DPI keeps cursor movement proportional to what you'd feel on a smaller screen. If you're gaming on 4K in a competitive FPS, you'd still stick to 400–800 DPI; the precision argument doesn't change based on resolution.
Yes, but not in isolation. DPI sets how responsive your hardware is. What matters for aim is your eDPI, your DPI multiplied by your in-game sensitivity. Two players with the same eDPI will feel the same crosshair speed regardless of whether one is running 400 DPI with a higher sensitivity and the other is running 800 DPI with a lower one. Where DPI does matter is precision: lower DPI gives more physical distance per pixel, which tends to make small corrections more consistent.
The majority of professional CS2 and Valorant players use between 400 and 800 DPI. Apex Legends pros tend to run higher, typically 800–1600. Overwatch 2 pros often run 800 DPI paired with a high in-game sensitivity. These numbers reflect the conventions of each game's competitive community more than any universal rule.
Start with DPI. Get your hardware into the right range for your use case, verify the real measured output, then adjust in-game sensitivity from there. Trying to fix a hardware DPI mismatch through in-game settings alone tends to produce sensitivity that feels manageable but never quite consistent.
Yes. A larger mouse pad allows more physical movement, which means you can run a lower DPI without running out of space mid-swipe. If you're on a small pad, you may need slightly higher DPI to keep full-screen traversals manageable. Extended pads give you the most flexibility and are generally recommended if you want to explore the lower DPI ranges seriously.
The DPI shown in your mouse software is a firmware target, not a confirmed measurement. To know your real output, measure it physically. Set a known distance using a ruler, move your mouse exactly that distance inside a DPI testing tool, and read the pixel count. The math gives you the actual DPI. Our DPI Analyzer does this directly in your browser, no download, no install.