DPI Analyzer on Mac: Test Your Mouse DPI in Browser
By DPI Analyzer TeamPublished Updated
If you use a Mac and have ever felt like your mouse sensitivity is slightly off, a little too fast in one game, a little sluggish in another, there is a good chance your real DPI does not match what the manufacturer printed on the box.
The fix is simple. You can run a DPI Analyzer directly in your browser, no software to install, no Terminal commands, no third-party apps cluttering your Applications folder. It takes about two minutes and gives you your actual measured DPI, not an estimate.
This guide covers everything specific to Mac: why macOS handles mouse tracking differently from Windows, which settings to change before you test, and how to read your results. If you want to understand the methods that do not require any tool at all, there is also a separate walkthrough on how to check your mouse DPI without software.
How to Use a DPI Analyzer on Mac: Step by Step
Once your tracking speed is set and your browser zoom is at 100%, the actual test is straightforward.
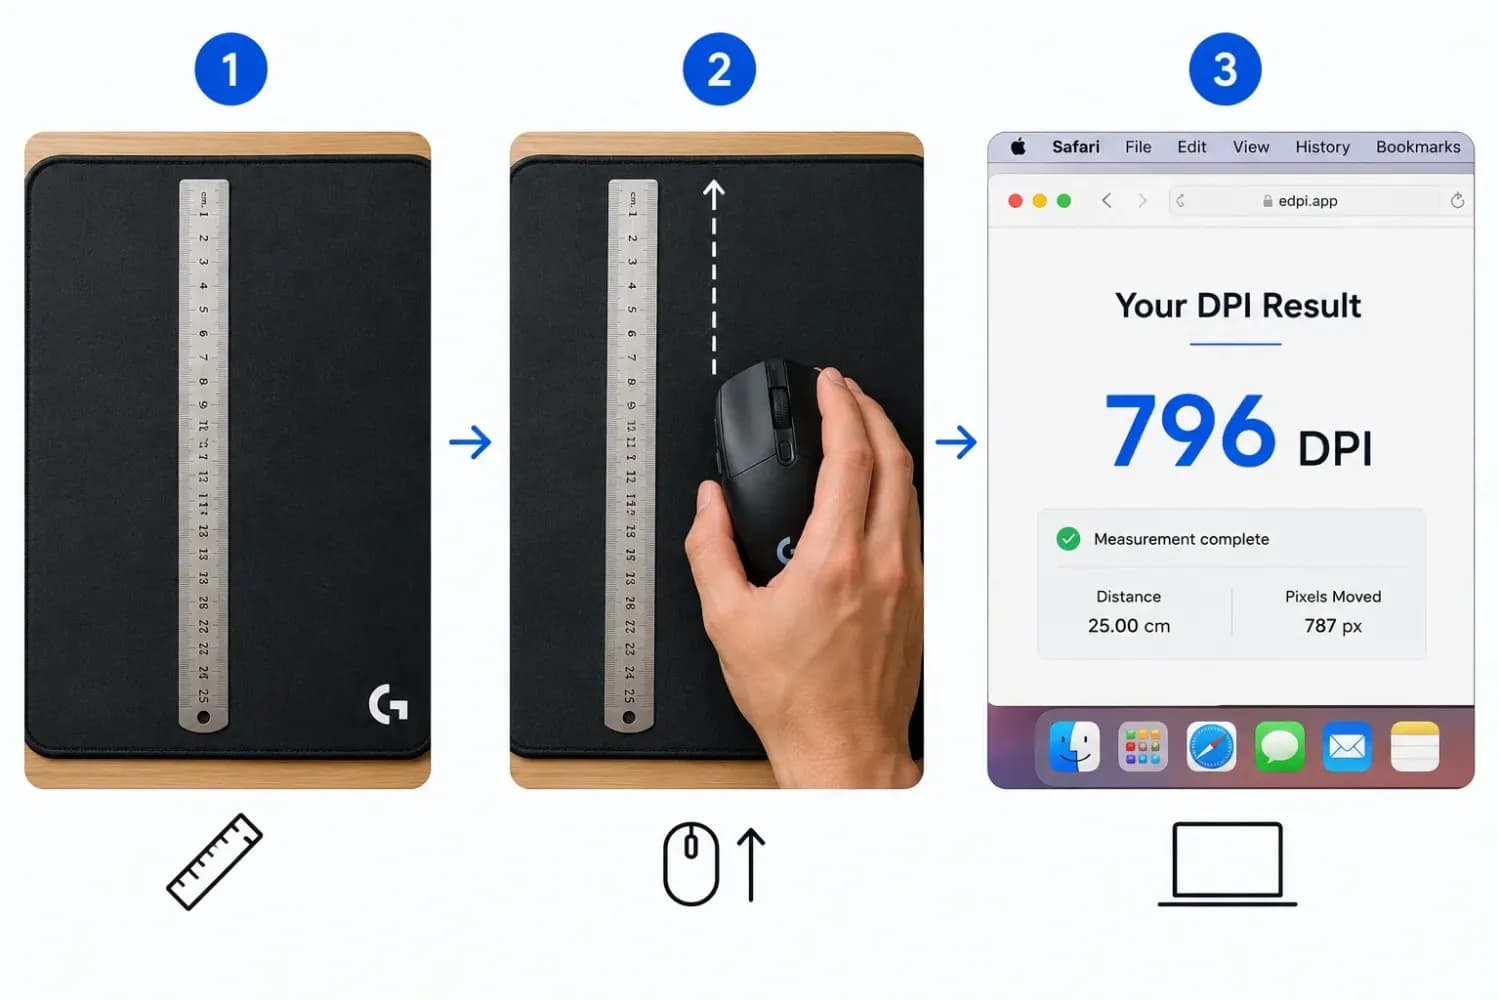
Step 1: Grab a Ruler
You need a physical ruler or a measured surface. Ten centimeters or four inches is good. The longer your distance, the more accurate your result because small errors in movement are averaged out over a greater distance.
Step 2: Launch the DPI Analyzer and Enter Your Distance
Launch the DPI analyzer in your browser. Enter your distance measurement and select your measurement unit: centimeters, millimeters, or inches. No download required and no sign-in needed.
Step 3: Click, Drag, and Drop.
Click and hold anywhere inside the measurement box. Move your mouse in a straight line along the ruler for exactly the distance you entered. Release. Your real DPI appears immediately.
The key is a straight, consistent movement. Do not lift the mouse off the pad mid-move, and try to keep the direction as close to horizontal as possible.
Step 4: Run the Test Multiple Times
Run it three to five times and take the average. Human hand movements aren't perfectly consistent, so one result might be a few DPI off in either direction. The average of several runs gives you a reliable number to work with.
How to Read Your Results
Small Deviations Are Normal
If your mouse is set to 800 DPI and you measure 793 or 812, that's normal hardware tolerance. Most gaming mice have a variance of plus or minus three to five percent. Manufacturers set firmware targets, not exact outputs, and physical factors like mousepad texture and sensor height all affect the real reading. For a closer look at how much variance to expect and why, see our breakdown of how accurate a DPI analyzer actually is.
Large Deviations Need Attention
If you are measuring 700 when your mouse is supposed to be 800, that is a twelve percent gap. At that level, any sensitivity settings you have dialed in for gaming or precision work are built on incorrect numbers. You would want to either recalibrate the DPI in your mouse software (if it supports it) or compensate by adjusting your in-game sensitivity based on the real figure. If you are not sure what to move it to, our DPI recommendations for every screen cover reliable starting points for gaming, design, and everyday use.
What to Do With Your Real DPI Number
Once you have your real DPI, you can use it to calculate your eDPI (effective DPI), convert sensitivity accurately between games, or finally explain why your aim felt slightly off even after following someone else's setup guide. The number that comes out of the tool is the one that reflects what your hardware is actually doing.
Why Mac Users Get Inaccurate DPI Readings Without Preparation
This is the part most guides skip, and it is the reason a lot of Mac users end up with DPI readings that do not make sense.
macOS applies a built-in mouse acceleration curve by default. This means the faster you move your mouse, the more the cursor speed multiplies beyond what your DPI hardware is actually doing. On Windows, you can disable this cleanly in one checkbox. On Mac, the system does not give you a direct toggle for true linear tracking.
The result: if you run a DPI test on a Mac without adjusting anything first, your reading will be inflated. The tool will count more pixels than your sensor actually produced because macOS added extra movement on top.
There is a second issue. macOS sets tracking speed as a relative scale, not a DPI value. Dragging that slider in System Settings does not give you a number. It just speeds up or slows down the cursor, and somewhere in between is the point where acceleration is least aggressive.
Neither of these problems makes Mac unsuitable for DPI testing. They just mean you need to set things up correctly before you start.
What to Do Before Running the Test on Mac
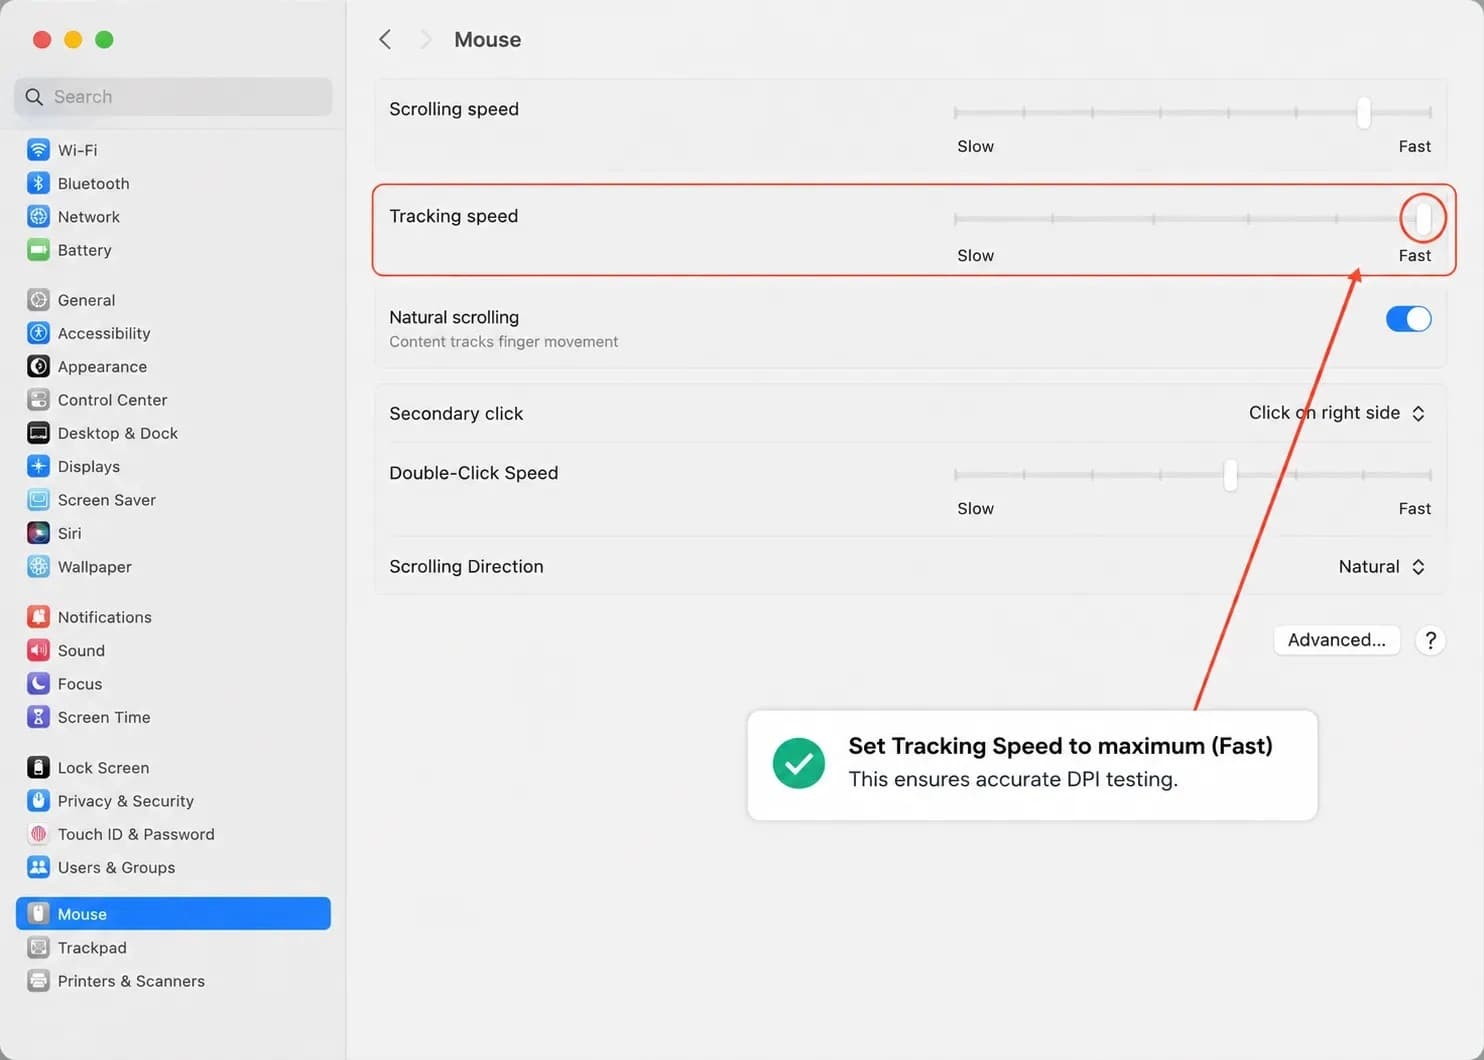
Set Tracking Speed to Max
Open System Settings (or System Preferences if you are on an earlier version of macOS). Go to Mouse and drag the Tracking Speed slider all the way to the right, to Fast.
This sounds counterintuitive, but it matters. The DPI analyzer measures how many pixels your cursor travels when you physically move your mouse a specific distance. If tracking speed is low, the cursor covers fewer pixels for the same physical movement, which causes your reading to underreport. Maximum tracking speed brings the software closer to representing what your hardware sensor is actually doing.
According to Macworld's guide to checking mouse DPI on Mac, macOS does not expose a raw DPI figure anywhere in System Settings; the tracking speed slider is the only native control Apple gives you over cursor movement. That is exactly why the browser-based measurement step matters so much on Mac.
Disable Mouse Acceleration (Optional but Recommended)
For the cleanest result, you want true 1:1 tracking, meaning every pixel the cursor moves corresponds directly to physical mouse movement, with no multiplier applied.
macOS does not give you this natively, but a free utility called LinearMouse does. After downloading and opening it, select your mouse, set the Pointer mode to Linear, and set Pointer Acceleration to Off. This removes the acceleration curve entirely and gives you the same raw input behavior that Windows users get when they disable Enhance Pointer Precision.
If you prefer not to install anything, setting tracking speed to maximum and running the test three to five times and averaging the results will still give you a usable reading.
Set Browser Zoom to 100%
This step applies to all platforms but is easy to forget. If your browser is zoomed in or out even slightly, the pixel count the tool measures will be distorted. Press Cmd + 0 in Chrome, Safari, or Firefox to reset zoom to 100% before starting.
Which Mice Work Well With a DPI Analyzer on Mac
Any USB or Bluetooth mouse that works on macOS is compatible with the DPI analyzer. The tool measures cursor movement at the browser level, so it does not matter whether your mouse is wired or wireless, gaming-grade or basic.
Gaming Mice With Dedicated Software
Mice from Logitech, Razer, SteelSeries, and Corsair each have Mac-compatible apps (G HUB, Razer Synapse, SteelSeries GG, and iCUE, respectively). These apps show your configured DPI and let you change presets directly. But the DPI they display is the firmware setting, not the measured sensor output. Running the browser test afterward tells you how close those two numbers actually are. For the full walkthrough of adjusting DPI in each of these apps, see our guide on how to change DPI on a mouse.
Apple Magic Mouse
The Magic Mouse does not have a DPI setting you can configure. Apple does not publish the sensor specification. If you want to know what DPI your Magic Mouse is operating at, the browser test is the only practical way to find out. Set tracking speed to maximum in System Settings first and run the test as described above.
Budget and Unbranded Mice
If your mouse came without software and has no DPI button, the product listing probably shows a single DPI figure. That figure is often rounded or approximate. The browser test will tell you the real output, which is especially useful before you start adjusting in-game sensitivity around a number you have no way to verify from the hardware side.
DPI Analyzer Mac vs Windows: What Is Actually Different
The core test works identically on both platforms. The differences are all about preparation.
On Windows, you disable Enhance Pointer Precision in Mouse Properties under Pointer Options. That removes the acceleration curve cleanly, and the test runs with 1:1 tracking by default. On Mac, the equivalent is either setting tracking speed to maximum (faster and easier) or installing LinearMouse for true raw input (more accurate).
The DPI analyzer itself runs in a browser, and modern browsers behave the same on macOS and Windows. Chrome, Firefox, Safari, and Edge all support the cursor-tracking method the tool uses. There is no Mac-specific version of the tool and no Mac-specific limitation.
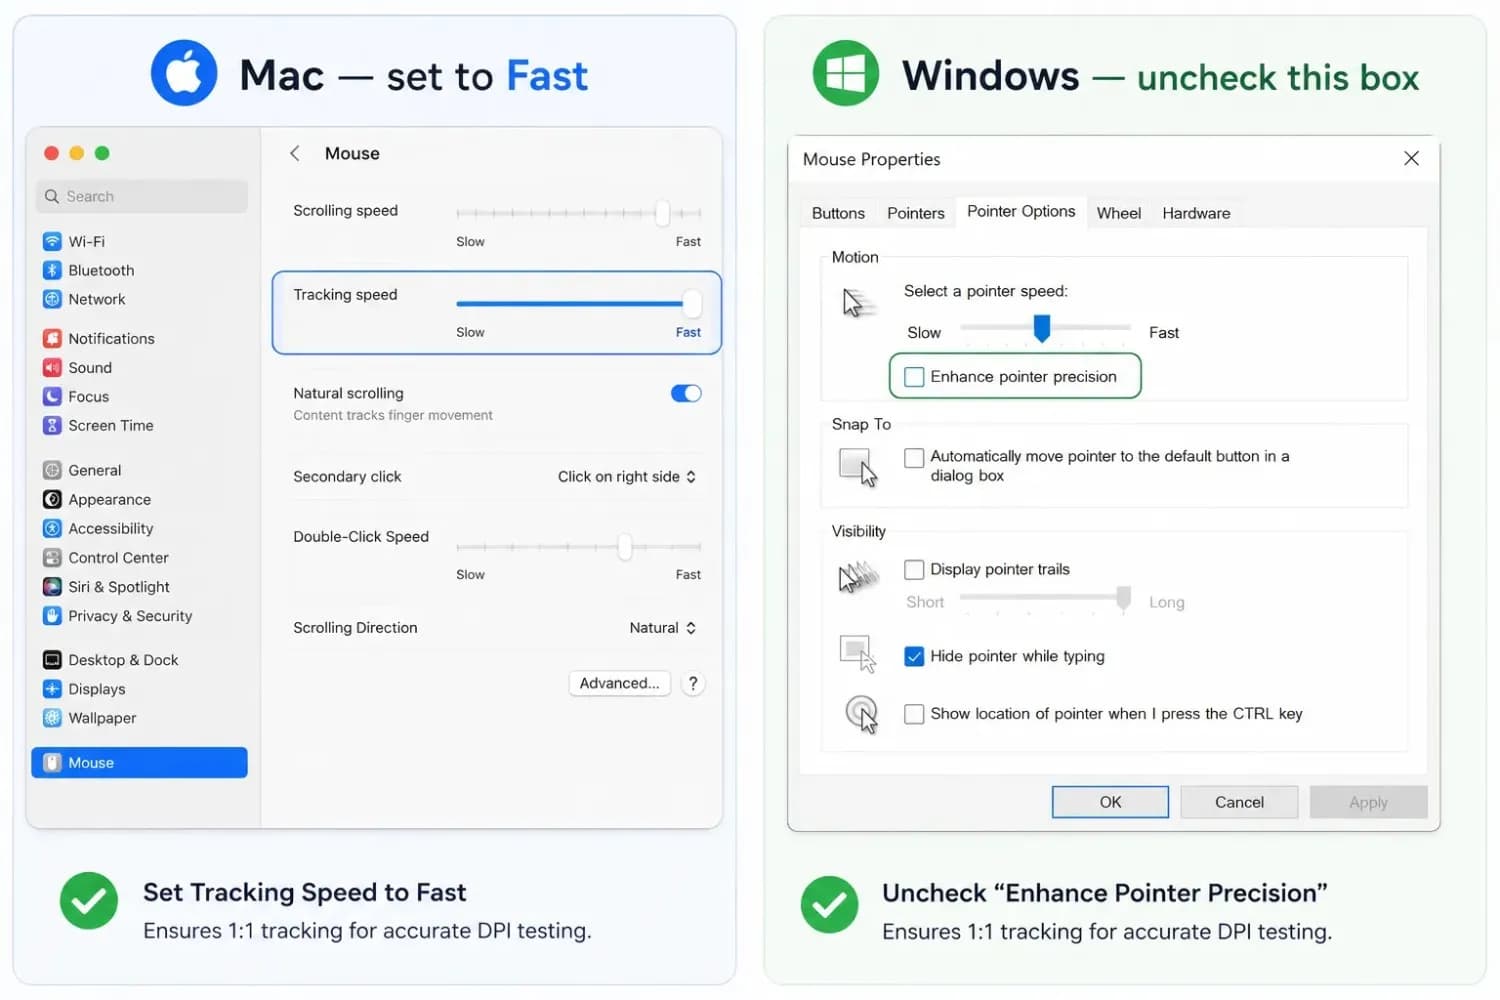
The main practical difference is that Mac users should expect to spend an extra minute adjusting System Settings before testing, compared to Windows users who just tick a box.
Conclusion
Testing your mouse DPI on a Mac takes one preparation step that Windows skips over, adjusting tracking speed, but the actual test is just as fast and just as accurate. Open the browser tool, set your distance, move your mouse the measured amount, and read the result.
The number you get is your hardware's real output, not a firmware estimate. Once you have that number, everything you build around it, in-game sensitivity, aim trainer settings, sensitivity conversions, is built on something you have actually measured. That tends to make a noticeable difference, and running it through a mouse sensitivity analyzer shows exactly how it plays out across your settings.
Related Tools and Guides
- DPI AnalyzerMeasure the DPI your mouse sensor actually delivers, using nothing but a ruler and your browser.
- How Accurate Is a DPI Analyzer?The real margin of error of a browser DPI analyzer, what affects it, and how to get readings within 1–2% of your true DPI.
- How to Check Mouse DPI Without a DPI AnalyzerUse manufacturer software, Windows settings, or a quick ruler method to find your exact sensitivity — no analyzer required.
- DPI Recommendations for Every ScreenThe right DPI for every screen size and resolution — from 1080p to 4K and multi-monitor setups, with pro references.
Measure your real DPI in 60 seconds
Open the DPI AnalyzerFrequently Asked Questions
Yes. The tool runs in any modern browser and does not depend on macOS system APIs. It works on Ventura, Sonoma, Sequoia, and any version of macOS that supports a current browser.
Yes. Safari supports the web standards that the tool uses. Make sure your browser zoom is at 100% (Cmd + 0) before starting. The result you get in Safari should be consistent with what you would get in Chrome or Firefox.
Nothing is wrong. Hand movement is not perfectly repeatable, and macOS acceleration can vary slightly based on how fast you move during the test. Run it five times and average the results. If you want a tighter spread, install LinearMouse and set acceleration to Off before testing; this eliminates the acceleration variable.
No. LinearMouse improves accuracy, especially on Macs, where tracking speed is difficult to nail down, but it is not required. You can approach the real number within a few percent by setting the tracking speed to maximum and running several tests. This is accurate enough for most use cases.
Yes. Bluetooth mice work the same way with this tool. The test measures cursor movement on screen, not the signal from the mouse hardware, so the connection type does not affect the result.
Most Mac displays are comfortable at 800 to 1200 DPI for general productivity and web browsing. If you’re doing precision design work in Figma or Illustrator, you’ll want a lower DPI, around 400 to 600, for finer control. For gaming on a Mac, most FPS players prefer 400 to 800 DPI with a matching in-game sensitivity setting.